
First boot
A new gateway configures itself like a home router: join its Wi-Fi, open the setup page, and answer a few questions. No serial tools, IP knowledge or Tailscale experience needed.
- Install the firmware from the browser installer or the Easy Install package.
- Power the board. After a few seconds it opens an open Wi-Fi network called
RecoveryGateway-Setup-XXXX(XXXX identifies your board). - Join that network with a phone or computer. Most phones and PCs then show a sign-in notification or open the setup page by themselves.
- If nothing opens, open
http://192.168.4.1/in a browser. This address always works while the setup network is active. - Confirm it is yours: press the BOOT button on the board once. No reachable button? Connect USB, open a serial console at 115200 baud and enter the current 8-digit code it prints in the setup page.
- Secure your gateway: create the admin password (at least 8 characters). There is no default password.
- Choose the Internet uplink: Wi-Fi, a W5500 Ethernet cable or a cellular modem. For Wi-Fi, pick your home network, enter its password and press Test connection. Next becomes available after the connection succeeds. Use Copy IP to keep the assigned address. If you edit the Wi-Fi settings, test again. Your phone may briefly lose the setup network. Ethernet and cellular are experimental and require external hardware. Then keep or change the name the gateway will use on your home network, such as
nas-gateway.local. - Connect Tailscale now? Choose Yes, connect now and enter a Tailscale or Headscale key, or Not now. Wake-on-LAN, device checks, Telegram, ntfy and Home Assistant work without Tailscale; you can connect it later from the dashboard. Set up remote Wake-on-LAN over Telegram or ntfy after first boot.
- Choose what you will use the gateway for: the functions are grouped by goal (wake and check devices, remote access, smart home and IoT, monitoring) and marked when they need Tailscale. A summary shows what each choice turns on now and what to set up after the restart. Network options and extras stay in expandable sections. Last, set the gateway's own Wi-Fi: an emergency Wi-Fi that turns on only when the home network is lost, or the always-on access point for IoT devices. It needs a password unless you explicitly choose an open network.
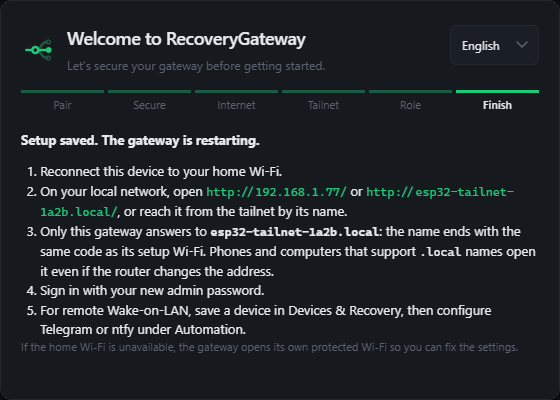
- Finish: the summary shows where the gateway will be, then it saves everything and restarts. Rejoin your home Wi-Fi and open a link from the last page: the address received during the Wi-Fi test, or the displayed
.localname. The default ishttp://esp32-tailnet-xxxx.local/, wherexxxxis the code of its setup Wi-Fi; a configured hostname can replace it. The client and LAN must support mDNS. If name resolution is unavailable, use the tested IP address. Once enrolled, the gateway's tailnet name is another option. Sign in: the roles you chose are highlighted under What do you want to do? at the end of the Status page.
The setup is available in English, Italiano, Español, 简体中文, Français and Deutsch. Select the language in the setup page; the browser also supplies the initial time zone.
Why the setup network is open, and how it is protected
The setup Wi-Fi has no password so that any phone can join it, but only a gateway that has never been configured opens it. An existing installation, including one updated from 1.13, never does.
- Only the person holding the board can pair: the BOOT button or the console code must confirm, and only one pairing at a time is allowed.
- Passwords and keys are encrypted in your browser before they cross the open network (X25519 key agreement and AES-256-GCM).
- While unconfigured, the gateway exposes no other function and forwards nothing to your home network.
Remaining risk: someone nearby, during the few minutes of setup, could imitate the setup network with a fake one. Set the gateway up where you can see it.
Later, without Wi-Fi
If the home Wi-Fi disappears, the gateway opens its own Wi-Fi (the name and password you chose; open only if you chose that) after about a minute, so you can sign in and fix the settings. That recovery network never uses the open setup mode. See Device recovery.